Swarm Bunker Lust Defense Turret & Artillery Tier List
Fixed emplacements ranked for lane coverage, burst damage, and bunker slot efficiency.
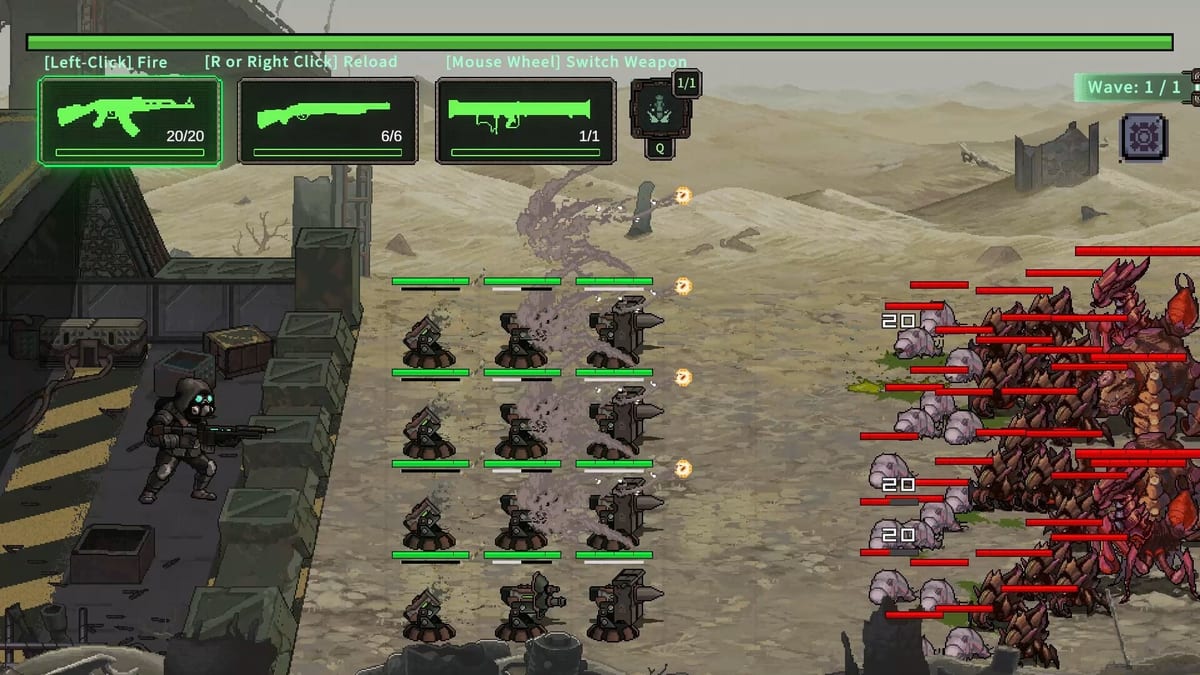
Turrets and artillery do the quiet work in Swarm Bunker Lust Defense: they punish lanes while you reload personal weapons or trigger bond skills. Because bunker slots are fixed, a bad emplacement wastes scrap for multiple chapters. This tier list ranks every turret type by coverage arc, target priority, upgrade path, and synergy with firearms from the Weapons tier list.
For placement fundamentals—where to mount, when to rotate, how artillery differs from auto turrets—read the dedicated Turrets guide first. Return here when you are deciding which emplacement to fund next.
Ranking method
We score turrets on:
- Lane coverage — degrees of fire and blind spots from default bunker layout
- Target selection — focus fire vs AoE vs anti-armor
- Upgrade ROI — scrap and parts per DPS gained
- Bond hooks — whether Celine, Lina, or Nora buffs apply (see Bond system)
Single-player only; multiplayer does not exist in the Steam release (app 4403260).
S-tier emplacements
Auto-gun turret (Mk II+) — Best generalist. Steady DPS, reliable targeting, low babysitting. Place on the longest open lane identified in your Walkthrough chapter notes. First S-tier purchase on most Best Build routes.
Artillery battery — S-tier for armored swarms and boss add waves. Slow cycle but deletes packs that slip past MG fire. Requires angle awareness; pair with How to Play camera tips so you do not shell your own breach.
A-tier emplacements
Flame turret — A-tier on funnel maps; B-tier elsewhere. Shreds unarmored density. Nora’s close-range bond can extend effective range one tier when her combat node is active.
Rocket turret — A-tier burst similar to personal RL but immobile. Excellent second emplacement after one auto-gun. Lina’s explosion bonuses apply—plan her route via Unlock scenes before investing heavily.
Sniper nest — A-tier for elite sniper enemies and weak-point phases; overkill on trash waves. Swap loadout per chapter using the stage tracker.
B-tier emplacements
Starter barricade turret — B-tier for Act I only.
Shock turret — B-tier crowd control; needs MG cleanup for kills.
Mine layer — B-tier niche; strong on single-choke custom layouts, weak on multi-spawn stages.
C-tier and situational
Decorative / quest turrets — C-tier combat value; keep for quests only.
Unupgraded auto-gun — C-tier stopgap—upgrade or replace before Act II bosses.
Slot planning table
| Bunker phase | Slot 1 | Slot 2 | Slot 3 (if unlocked) |
|---|---|---|---|
| Early Act I | Auto-gun | Flame OR second auto-gun | — |
| Mid campaign | Auto-gun | Artillery | Rocket turret |
| Late campaign | Mk II auto-gun | Artillery | Sniper OR rocket (chapter dependent) |
Adjust after recording failures on stage tracker—three leaks on the same lane mean coverage, not weapon tier, is the problem.
Firearms plus turret pairings
| Personal weapon | Best turret partner | Why |
|---|---|---|
| HMG | Artillery | MG handles chaff; artillery deletes armor |
| Rocket launcher | Auto-gun | Turret sustains while RL reloads |
| Shotgun | Flame turret | Both punish breach rush |
Cross-check personal weapon tiers on Weapons tier list before doubling up on the same role.
Upgrade priority vs weapons
The upgrade checklist recommends:
- One S-tier auto-gun turret
- First personal MG to blue tier
- Artillery OR rocket turret (whichever your chapter lacks)
- Second turret Mk II
- Firearm luxury upgrades
Turrets define your floor; firearms define your ceiling. Neglecting emplacements forces you to aim perfectly every wave—miserable on Steam Deck without gyro.
Heroine bond effects on emplacements
- Celine — Reload and overheating reduction on auto-gun turrets she maintains in story scenes.
- Lina — Splash radius on rocket turrets and artillery shells.
- Nora — DoT extension on flame turrets and breach traps.
Route order matters: a flame turret with Nora unlocked beats an S-tier auto-gun without bond support on specific indoor chapters. Plan on Characters hub.
When patches change turrets
Balance notes in Updates often mention artillery splash or turret scrap costs first. After patches, rerun one failed chapter before reshuffling your entire build. Wiki review summaries help catch changes not spelled out in patch notes.
Frequently Asked Questions
Quick answers to the most common questions.
How many turrets can the bunker hold?
Slots unlock with story progress—typically two early, three mid-campaign. The [Turrets guide](/guides/turrets/) lists exact unlock beats.
Artillery vs rocket turret—which wins?
Artillery for range and armor; rocket turret for faster cycle and lower upfront cost. Most players want one of each by Act III.
Do turrets benefit from bond scenes?
Combat bond nodes yes; cosmetic scenes no. Full breakdown on [Bond system](/characters/bond-system/).
Should I match turret types to my MG?
Complement, do not duplicate. MG plus artillery covers more than double auto-guns unless a chapter is pure swarm density.
Where is the full tier list hub?
See [Tier List hub](/tier-list/) for hub navigation and ranking rules shared across all lists.